December 31, 2015

Happy_New_Year_2016_Sinful_Colors_Twilight_Twinkles

Happy New Year Everybody!


Here is my New Years mani, I keep it pretty simple with a bit of glitter and stamping.

Happy_New_Year_2016_Sinful_Colors_Twilight_Twinkles

I used Sinful Colors Snow White Me, Sinful Colors Twilight Twinkles, Funky Fingers Dark Knight, Pueen Fireworks Festival Stamping Plate, XL Jelly Stamper, Black Acrylic Paint and a small nail art brush.
Happy_New_Year_2016_Sinful_Colors_Twilight_Twinkles

I'm happy with the finished look, I wanted the gold to look like confetti and the black swirls to look like the streamers. I think next year I will attempt fireworks. I hope everyone has a great New Years Eve, I will be spending time with my family watching the countdown from home. I hope everyone enjoys themselves and is safe. Thanks for all the love and support you all have given me this year, I hope you stick around to see whats in store for next year!


Happy New Year 2016!

Read More

December 30, 2015

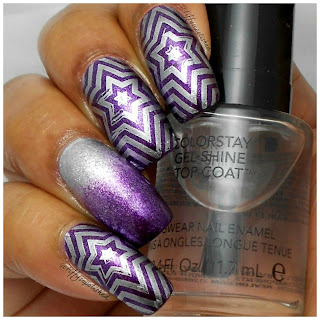
Sinful_Colors_Purple_Heart_with_Born_Pretty_BP_11_Stamped_Stars


This is the 3rd mani from the Weekly Nail Art Challenge (#WNAC2015) on instagram which is hosted by @missbellatracey, @simplynailogical and @kgrdnr. 

The theme for the month is Festive.


This week's prompt is: Stars

I used Sinful Colors Purple Heart, Forever 21 Nail Color in Pewter, Born Pretty Store Stamping Plate BP 11, XL Jelly Stamper and cosmetic sponge.
Sinful_Colors_Purple_Heart_with_Born_Pretty_BP_11_Stamped_Stars


How to get this look:
  1. On index, middle and pinky nails paint 2 coats of Purple Heart and let dry
  2. Place a couple drops of Pewter on stamping plate, scrape and pick up with stamper. Line up and place on nails
  3. On ring finger and thumb paint 2 coats of pewter and let dry completely 
  4. Using the cosmetic sponge, paint the edge of the sponge with purple heart and overlap slightly with the pewter polish
  5. Dab sponge over the edge of the nail to create a gradient and let dry
  6. Repeat painting polishes onto sponge and dabbing it over nail until happy with the gradient and let dry
  7. Finish by topping all nails with top coat


Sinful_Colors_Purple_Heart_with_Born_Pretty_BP_11_Stamped_Stars

I was pretty excited when I saw this weeks theme was stars because I've been dying to try out this stamping plate. I wished it looked a bit more like the stars are jumping out at you but I have some ideas on how to get the look for that next time. 

Thanks for stopping by and please check back throughout
the week for more nail art and swatches!


Purple Star Gradient ft. Born Pretty Stamping Plate BP 11 #WNAC2015

Read More

December 12, 2015

Christmas_Sweater_Nails_Stamping_Sinfulcolors_Sugar_Sugar

Hey Guys,

This is the 2nd mani from the Weekly Nail Art Challenge (#WNAC2015) on instagram which is hosted by @missbellatracey, @simplynailogical and @kgrdnr. 

The theme for the month is Festive.


This week's prompt is: Christmas Sweater

I used Sinful Colors Sugar Sugar, Funky Fingers Gesso, Revlon ColorStay Gel Shine Top Coat, Aliexpress Stamping Plate BCN 010 and Jumbo Squishy Stamper and Scraper.
Christmas_Sweater_Nails_Stamping_Sinfulcolors_Sugar_Sugar

How to get this look:

  1. Paint on 2 coats of Sugar Sugar and let dry
  2. Place a dot of Gesso on the poinsettia image and scrape off 
  3. Pick up poinsettia image and place it on pinky. Repeat on index finger and thumb
  4. Place a dot of Gesso on the reindeer image and scrape it off
  5. Pick up reindeer image and place on middle finger. Repeat on ring finger.
  6. Seal with top coat
Christmas_Sweater_Nails_Stamping_Sinfulcolors_Sugar_Sugar

I really liked the way this design came out and the red and white really reminds me of a old school christmas sweater. I hope you enjoyed the look.


Thanks for stopping by and please check back throughout the week for more nail art and swatches!

Christmas Sweater Nails #WNAC2015

Read More

December 6, 2015

Winter_Wonderland_Snowflakes_Winter_Christmas_Stamping

Hey Guys,

I had so much fun taking part in all the nail art challenges this past month that I decided to join the 

Weekly Nail Art Challenge(#WNAC2015) on instagram which is hosted by @missbellatracey, @simplynailogical and @kgrdnr. 

The theme for the month is Festive.


This week's prompt is: Snowflakes

I used Zoya Dream, Bonita Dream Wonderland, Funky Finger Gesso, Essence Shake Me I'm Pretty, Revlon ColorStay Gel Shine Top Coat, Born Pretty Store Plate QA58 and Winstonia Clear Squishy XL Stamper and scraper.
Winter_Wonderland_Snowflakes_Winter_Christmas_Stamping

To get this look:
  1. Paint 2 coats of Zoya Dream on all nails, Let dry completely
  2. On plate QA58, place a dot of Dream Wonderland, scrap and pick up using stamper. Place individual snowflakes on nails
  3. Repeat the process using Gesso and seal with top coat
  4. Paint on 1 coat of Shake Me I'm Pretty
  5. Finish off with top coat
Winter_Wonderland_Snowflakes_Winter_Christmas_Stamping

I hope you like the look!

Thanks for stopping by and please check back throughout the week for more nail art and swatches!

Winter Wonderland Snowflakes #WNAC2015

Read More

December 3, 2015

Bonita_Salon_Fabulously_Diva_Collection

Hey Guys,

This is my first time trying out the Bonita polish line and I have to say I'm super excited. I seen a few of their polishes swatch online and the colors have always been so pretty and I've wanted to try them out for awhile, so when I saw them I had to grab them up. Now on to the swatches!

Dream Wonderland

Bonita_Salon_Dream_Wonderland_Fabulously_Diva_Collection
Color: Silver
Formula: Smooth with a perfect consistency 
Finish: Metallic with a brushed metal look
Coverage: 1 coat 
Notes: Brush strokes are very visible, stamps well
Bonita_Salon_Dream_Wonderland_Fabulously_Diva_Collection
Bonita Dream Wonderland

True Diva

Bonita_Salon_True_Diva_Fabulously_Diva_Collection

Color: Bright Cherry Red
Formula: Smooth with a perfect consistency
Finish: Glossy with light shimmer 
Coverage: 1 Coat
Notes: Brush strokes are slightly visible
Bonita_Salon_True_Diva_Fabulously_Diva_Collection
Bonita True Diva

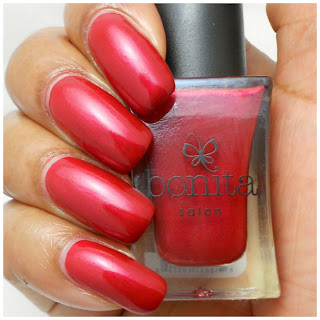
Prima Donna

Bonita_Salon_Prima_Donna_Fabulously_Diva_Collection

Color: Vampy Ox Blood Red
Formula: Smooth a bit thicker that the others
Finish: Glossy with light shimmer
Coverage: 1 thick and 2 thin coats
Bonita_Salon_Prima_Donna_Fabulously_Diva_Collection
Bonita Prima Donna

Made To Envy

Bonita_Salon_Made_to_Envy_Fabulously_Diva_Collection

Color: Bright Teal
Formula: Thin but Smooth and easy to use
Finish: Glossy with subtle shimmer and teal flecks 
Coverage: 2 coats
Bonita_Salon_Made_to_Envy_Fabulously_Diva_Collection
Bonita Made To Envy

Fantasy Flowers

Bonita_Salon_Fantasy_Flowers_Fabulously_Diva_Collection

Color: Fuchsia
Formula: Thin and a bit sheer
Finish: Glossy with subtle shimmer
Coverage: 2 coats
Bonita_Salon_Fantasy_Flowers_Fabulously_Diva_Collection
Bonita Fantasy Flowers

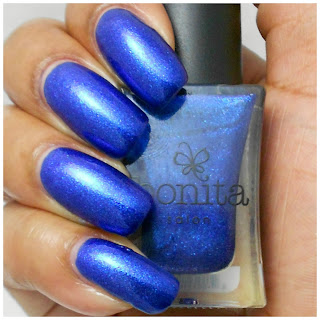
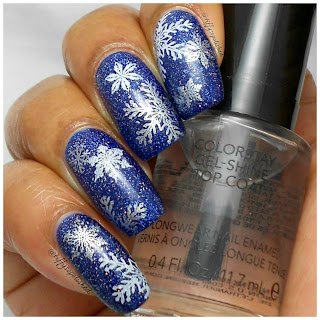
Royal Wishes

Bonita_Salon_Royal_Wishes_Fabulously_Diva_Collection

Color: Royal Blue with purple and royal blue micro glitter
Formula: Thin and sheer
Finish: Glossy and very glitter
Coverage: 2 coats
Notes: Purple glitter isn't visible on the nail
Bonita_Salon_Royal_Wishes_Fabulously_Diva_Collection
Bonita Royal Wishes
Overall: Collection has a great formula that's easy to work with and goes on very smooth. The colors all have a great shimmer and glowiness to them. I picked them up from my local Kmart for about $2.50 each. I was very happy with the quality of the polish and  would definately buy from them again. My favorite is Made to Envy, which color do you like the best?

Bonita_Salon_Fabulously_Diva_Collection

Thanks for stopping by!


Bonita Salon Fabulously Diva Collection

Read More

December 1, 2015

Pancreatic_Cancer_Awareness_Ribbon_Zoya_Aurora_BP26

This is my 5th and final mani I'm doing for the Pancreatic Cancer Awareness Nail Challenge(#pcanovember15) on instagram. This challenge is being hosted by @starryeyed83 and @ladyandthe_stamp and their goal is to bring more awareness to the disease. All manis for this challenge must include the color Purple.

The second prompt is: Glitter

I used Zoya Aurora, Orly Sinister Sea Witch, Wet N Wild Disturbia, Born Pretty Plate BP-26, Jumbo Clear Squishy Stamper, Quick Dry Top Coat.
Pancreatic_Cancer_Awareness_Ribbon_Zoya_Aurora_BP26
How I got this look:

  1. Paint 2 coats of Aurora on pinky, middle and index fingers and let dry
  2. On ring finger and thumb paint 2 coats of Sinister Sea Witch and let dry
  3. Place a drop of Disturbia on plate BP-26, scrape and pick up with jumbo clear squishy stamper
  4. Place image on ring finger and thumb.
  5. Top all nails with quick dry top coat

Pancreatic_Cancer_Awareness_Ribbon_Zoya_Aurora_BP26

Thanks for stopping by and please check back throughout the week for more nail challenge inspired manis!

Missed last weeks challenge mani? Check it out Here


Pancreatic Cancer Awareness Ribbon Nail Design #pcanovember15 pt. 5

Read More

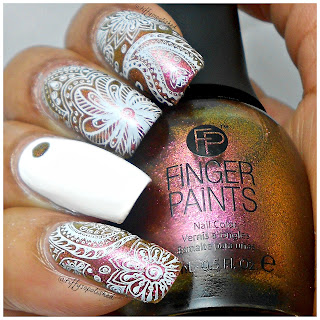
Bundle_Monster_ShangriLa_Duochrome_Paisley _Print_Stamping

This is my 4th and last mani for the Weekly Nail Art Challenge(#WNAC2015) on instagram which is hosted by @missbellatracey, @simplynailogical and @kgrdnr. 

The theme for the month is Elegance.


This weeks prompt is: Paisley

I used Finger Paints Surreal Sunset, Funky Fingers Gesso, Bundle Monster BM-S107, Quick dry top coat, dotting tool and Clear Jumbo Squishy Stamper.
Bundle_Monster_ShangriLa_Duochrome_Paisley _Print_Stamping
Here is how to get this look:
  1. On ring finger and thumb paint 2 coats of Gesso and let dry
  2. Once completely dry, use dotting tool to pick up a drop of Surreal Sunset and place as a accent.
  3. Paint 2 coats of Surreal Sunset on pinky, middle and index fingers and let dry
  4. Place a drop of Gesso on plate BM-S107, scrape and pick up with jumbo squishy stamper and place on nails 
  5. Top everything off with a quick dry top coat
Bundle_Monster_ShangriLa_Duochrome_Paisley _Print_Stamping

Thanks for stopping by and please check back throughout the next few weeks for more nail challenge inspired manis!
Did you miss last weeks challenge mani? Check it out Here

Bundle Monster Duochrome Paisley Print #Wnac2015 pt.4

Read More

November 22, 2015

Royal_Purple_Stamped_Peacock_Feather_Nails

This is my 4th mani I'm doing for the Pancreatic Cancer Awareness Nail Challenge(#pcanovember15) on instagram. This challenge is being hosted by @starryeyed83 and @ladyandthe_stamp and their goal is to bring more awareness to the disease. All manis for this challenge must include the color Purple.

The second prompt is: Wings/Feathers

I used Forever21 Nail Polish in Aubergine/Silver, Revlon Brilliant Strength in Hypnotize, Sephora X in Unbearable, Sally Hansen Triple Shine in Sparkling Waters, Quick Dry Top Coat, Born Pretty Store Stamping Plate in BP-30, Dotting tool, Jumbo Squishy Nail Stamper.

Royal_Purple_Stamped_Peacock_Feather_Nails

How to get this look:

  1. Paint pinky, middle and index fingers with 2 coats of Aubergine/Silver, let it dry completely.
  2. Using Hypnotize place a couple drops on the peacock image on plate BP-30. 
  3. Scrape paint off and pick up image, place on nails. 
  4. On ring finger and thumb paint 2 coats of Unbearable and let dry.
  5. Using Aubergine/Silver, Sparkling Waters and Dotting Tool add interchanging dots of each color. Let dry completely. 
  6. Finish off all nails with 1 coat of quick dry top coat.

Royal_Purple_Stamped_Peacock_Feather_Nails


Thanks for stopping by and please check back throughout the week for more nail challenge inspired manis!
Missed last weeks challenge mani? Check it out Here

Stamped Peacock Feather Nails #Pcanovember15 pt.4

Read More

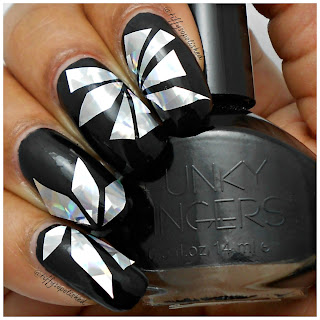
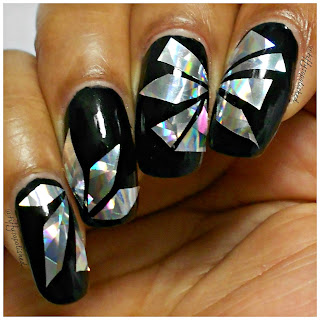
Shattered_Glass_Holographic_Broken_Mirror_Nails_Tutorial


This is my 3rd mani for the Weekly Nail Art Challenge(#WNAC2015) on instagram which is hosted by @missbellatracey, @simplynailogical and @kgrdnr. 

The theme for the month is Elegance.


This weeks prompt is: Shattered Glass

I used Funky Fingers Dark Knight, Quick Dry Top Coat, Holographic cellophane(gift wrap) and Scissors 
Shattered_Glass_Holographic_Broken_Mirror_Nails_Tutorial
With the new trend a lot of people use clear irridescent cellophane over either black or white polish. With my attempt at the look I tried something a bit different and used a opaque silver holographic cellophane, to give it more of a broken mirror look. Unfortunately the photos don't do the holographic shards any justice but they sparkle beautifully in person.

To get this look:
  1. Take sheet of cellophane and using scissors cut into small pieces(triangles or diamonds)
  2. Think about placement and test out look on nails. Cut and adjust as needed.
  3. Paint on base coat and 1 coat of  Dark Knight, let it dry.
  4. Paint on 1 coat of quick dry top coat and quickly place the cellophane shards. Add as many or as little as you are happy with(work 1 nail at a time)
  5. Finish with 1 or 2 coats on quick dry top coat to help flatten all pieces.

Shattered_Glass_Holographic_Broken_Mirror_Nails_Tutorial
The Holo is a bit more visible in full light 

Thanks for stopping by and please check back throughout the next few weeks for more nail challenge inspired manis!
Did you miss last weeks challenge mani? Check it out Here


Shattered Glass Broken Mirror Nails #WNAC2015 pt.3

Read More